

인증 및 권한 부여는 컴퓨터 보안의 기본 개념입니다. 귀하는 귀하의 신원을 증명하고 자신을 등록된 사용자로 식별한 다음 추가 권한을 얻기 위해 자격 증명(예: 사용자 이름 및 비밀번호)을 사용합니다.
이는 Facebook 또는 Google 계정을 사용하여 온라인 서비스에 로그인할 때도 적용됩니다.
이 기사에서는 JWT(JSON 웹 토큰) 인증을 사용하여 Nodejs API를 빌드합니다. 이 튜토리얼에서 사용할 도구는 다음과 같습니다.
- Expressjs
- 몽고DB 데이터베이스
- 몽구스
- 도텐브
- Bcryptjs
- Jsonwebtoken
목차
인증 대 권한 부여
인증이란 무엇입니까?
인증은 이메일, 비밀번호 및 토큰과 같은 자격 증명을 획득하여 사용자를 식별하는 프로세스입니다. 주어진 자격 증명은 등록된 사용자의 자격 증명과 비교되며, 이는 로컬 컴퓨터 시스템 또는 모든 데이터베이스의 파일에서 사용할 수 있습니다. 주어진 자격 증명이 데이터베이스의 사용 가능한 데이터와 일치하면 인증 프로세스가 완료되고 사용자는 리소스에 액세스할 수 있습니다.
승인이란 무엇입니까?
인증은 인증 후에 이루어집니다. 모든 권한 부여에는 인증 프로세스가 있어야 합니다. 사용자가 시스템이나 웹사이트에서 리소스에 액세스할 수 있도록 하는 프로세스입니다. 이 튜토리얼에서는 로그인한 사용자가 사용자 데이터에 액세스할 수 있는 권한을 부여합니다. 사용자가 로그인하지 않은 경우 데이터 액세스를 사용할 수 없습니다.
승인의 가장 좋은 예는 Facebook 및 Twitter와 같은 소셜 미디어 플랫폼입니다. 계정이 없으면 소셜 미디어 콘텐츠에 액세스할 수 없습니다.
승인의 또 다른 예는 구독 기반 콘텐츠입니다. 인증은 웹사이트에 로그인하여 수행할 수 있지만 구독하지 않을 때까지 콘텐츠에 액세스할 수 있는 권한이 부여되지 않습니다.
전제 조건
계속 진행하기 전에 Javascript와 MongoDB에 대한 기본적인 이해와 Nodejs에 대한 좋은 지식이 있다고 가정합니다.
로컬 컴퓨터에 node와 npm을 설치했는지 확인하십시오. node 및 npm이 컴퓨터에 설치되어 있는지 확인하려면 명령 프롬프트를 열고 node -v 및 npm -v를 입력합니다. 그러면 다음 결과가 표시되어야 합니다.
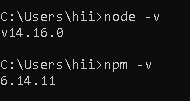
귀하의 버전은 나와 다를 수 있습니다. NPM은 노드와 함께 자동으로 다운로드됩니다. 아직 다운로드하지 않은 경우 다음에서 다운로드하십시오. NodeJS 웹사이트.
코드를 작성하려면 IDE(통합 개발 환경)가 필요합니다. 이 튜토리얼에서는 VS 코드 편집기를 사용하고 있습니다. 다른 하나가 있으면 그것도 사용할 수 있습니다. 컴퓨터에 IDE가 설치되어 있지 않은 경우 다음에서 다운로드할 수 있습니다. 비주얼 스튜디오 웹사이트. 로컬 시스템에 따라 다운로드하십시오.
프로젝트 설정
로컬 컴퓨터의 아무 곳에나 nodeapi라는 폴더 이름을 만든 다음 vs-code로 엽니다. vs-code 터미널을 열고 다음을 입력하여 노드 패키지 관리자를 초기화합니다.
npm init -y
nodeapi 디렉토리에 있는지 확인하십시오.
위의 명령은 이 프로젝트에서 사용할 모든 종속성을 포함하는 package.json 파일을 생성합니다.
이제 위에서 언급한 모든 패키지를 다운로드하고 터미널에 입력하고 입력합니다.
npm install express dotenv jsonwebtoken mongoose bcryptjs
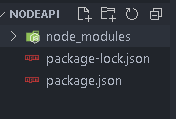
이제 아래와 같이 파일과 폴더가 생깁니다.
서버 생성 및 데이터베이스 연결
이제 index.js라는 파일과 config라는 폴더를 만듭니다. config 내에서 데이터베이스에 연결하기 위해 conn.js라는 두 개의 파일을 만들고 환경 변수를 선언하기 위해 config.env를 만듭니다. 아래에 주어진 코드를 해당 파일에 작성하십시오.
index.js
const express = require('express');
const dotenv = require('dotenv');

//Configure dotenv files above using any other library and files
dotenv.config({path:'./config/config.env'});

//Creating an app from express
const app = express();

//Using express.json to get request of json data
app.use(express.json());


//listening to the server
app.listen(process.env.PORT,()=>{
    console.log(`Server is listening at ${process.env.PORT}`);
})
dotenv를 사용하는 경우 환경 변수를 사용하는 다른 파일을 호출하기 전에 index.js 파일에서 구성하십시오.
conn.js
const mongoose = require('mongoose');

mongoose.connect(process.env.URI,
    { useNewUrlParser: true,
     useUnifiedTopology: true })
    .then((data) => {
        console.log(`Database connected to ${data.connection.host}`)
})
config.env
URI = 'mongodb+srv://ghulamrabbani883:[email protected]/?retryWrites=true&w=majority'
PORT = 5000
나는 mongo-DB Atlas URI를 사용하고 있으며 localhost도 사용할 수 있습니다.
모델 및 경로 생성
모델은 Mongo-DB 데이터베이스의 데이터 레이아웃이며 JSON 문서로 저장됩니다. 모델을 생성하기 위해 몽구스 스키마를 사용할 것입니다.
라우팅은 애플리케이션이 클라이언트 요청에 응답하는 방식을 나타냅니다. 익스프레스 라우터 기능을 사용하여 경로를 생성합니다.
라우팅 방법은 일반적으로 두 개의 인수를 사용합니다. 첫 번째는 경로이고 두 번째는 이 경로가 클라이언트의 요청에 따라 수행할 작업을 정의하는 콜백 함수입니다.
또한 인증 프로세스와 같이 필요할 때 미들웨어 기능으로 세 번째 인수를 취합니다. 인증된 API를 구축함에 따라 미들웨어 기능을 사용하여 사용자를 인증하고 인증할 것입니다.
이제 route와 model이라는 두 개의 폴더를 생성합니다. 경로 안에 userRoute.js라는 파일 이름을 만들고 모델 폴더 안에 userModel.js라는 파일 이름을 만듭니다. 파일 생성 후 해당 파일에 다음 코드를 작성합니다.
userModel.js
const mongoose = require('mongoose');

//Creating Schema using mongoose
const userSchema = new mongoose.Schema({
    name: {
        type:String,
        required:true,
        minLength:[4,'Name should be minimum of 4 characters']
    },
    email:{
        type:String,
        required:true,
        unique:true,
    },
    password:{
        type:String,
        required:true,
        minLength:[8,'Password should be minimum of 8 characters']
    },
    token:{
        type:String
    }
})

//Creating models
const userModel = mongoose.model('user',userSchema);
module.exports = userModel;
userRoute.js
const express = require('express');
//Creating express router
const route = express.Router();
//Importing userModel
const userModel = require('../models/userModel');

//Creating register route
route.post('/register',(req,res)=>{

})
//Creating login routes
route.post('/login',(req,res)=>{

})

//Creating user routes to fetch users data
route.get('/user',(req,res)=>{

})
경로 기능 구현 및 JWT 토큰 생성
JWT 란 무엇입니까?
JSON 웹 토큰(JWT)은 토큰을 생성하고 확인하는 자바스크립트 라이브러리입니다. 클라이언트와 서버의 두 당사자 간에 정보를 공유하는 데 사용되는 개방형 표준입니다. JWT의 두 가지 기능을 사용할 것입니다. 첫 번째 기능은 새 토큰을 생성하는 기호이고 두 번째 기능은 토큰을 확인하는 확인입니다.
bcryptjs 란 무엇입니까?
Bcryptjs는 Niels Provos와 David Mazières가 만든 해싱 함수입니다. 해시 알고리즘을 사용하여 암호를 해시합니다. 이 프로젝트에서 사용할 가장 일반적인 두 가지 기능이 있습니다. 첫 번째 bcryptjs 함수는 해시 값을 생성하는 해시이고 두 번째 함수는 비밀번호를 비교하는 비교 함수입니다.
경로 기능 구현
라우팅의 콜백 함수는 요청, 응답 및 다음 함수의 세 가지 인수를 취합니다. 다음 인수는 선택 사항입니다. 필요할 때만 전달하십시오. 이러한 인수는 요청, 응답 및 다음 순서에 있어야 합니다. 이제 다음 코드로 userRoute.js, config.env, index.js 파일을 수정합니다.
userRoute.js
//Requiring all the necessary files and libraries
const express = require('express');
const bcrypt = require('bcryptjs');
const jwt = require('jsonwebtoken');

//Creating express router
const route = express.Router();
//Importing userModel
const userModel = require('../models/userModel');

//Creating register route
route.post("/register", async (req, res) => {

    try {
        const { name, email, password } = req.body;
        //Check emptyness of the incoming data
        if (!name || !email || !password) {
            return res.json({ message: 'Please enter all the details' })
        }

        //Check if the user already exist or not
        const userExist = await userModel.findOne({ email: req.body.email });
        if (userExist) {
            return res.json({ message: 'User already exist with the given emailId' })
        }
        //Hash the password
        const salt = await bcrypt.genSalt(10);
        const hashPassword = await bcrypt.hash(req.body.password, salt);
        req.body.password = hashPassword;
        const user = new userModel(req.body);
        await user.save();
        const token = await jwt.sign({ id: user._id }, process.env.SECRET_KEY, {
            expiresIn: process.env.JWT_EXPIRE,
        });
        return res.cookie({ 'token': token }).json({ success: true, message: 'User registered successfully', data: user })
    } catch (error) {
        return res.json({ error: error });
    }

})
//Creating login routes
route.post('/login', async (req, res) => {
    try {
        const { email, password } = req.body;
        //Check emptyness of the incoming data
        if (!email || !password) {
            return res.json({ message: 'Please enter all the details' })
        }
        //Check if the user already exist or not
        const userExist = await userModel.findOne({email:req.body.email});
        if(!userExist){
            return res.json({message:'Wrong credentials'})
        }
        //Check password match
        const isPasswordMatched = await bcrypt.compare(password,userExist.password);
        if(!isPasswordMatched){
            return res.json({message:'Wrong credentials pass'});
        }
        const token = await jwt.sign({ id: userExist._id }, process.env.SECRET_KEY, {
            expiresIn: process.env.JWT_EXPIRE,
        });
        return res.cookie({"token":token}).json({success:true,message:'LoggedIn Successfully'})
    } catch (error) {
        return res.json({ error: error });
    }

})

//Creating user routes to fetch users data
route.get('/user', async (req, res) => {
    try {
        const user  = await userModel.find();
        if(!user){
            return res.json({message:'No user found'})
        }
        return res.json({user:user})
    } catch (error) {
        return res.json({ error: error });
    }
})

module.exports = route;
Async 함수를 사용하는 경우 try-catch 블록을 사용하십시오. 그렇지 않으면 처리되지 않은 약속 거부 오류가 발생합니다.
config.env
URI = 'mongodb+srv://ghulamrabbani883:[email protected]/?retryWrites=true&w=majority'
PORT = 5000
SECRET_KEY = KGGK>HKHVHJVKBKJKJBKBKHKBMKHB
JWT_EXPIRE = 2d
index.js
const express = require('express');
const dotenv = require('dotenv');

//Configure dotenv files above using any other library and files
dotenv.config({path:'./config/config.env'});
require('./config/conn');
//Creating an app from express
const app = express();
const route = require('./routes/userRoute');

//Using express.json to get request of json data
app.use(express.json());
//Using routes

app.use('/api', route);

//listening to the server
app.listen(process.env.PORT,()=>{
    console.log(`Server is listening at ${process.env.PORT}`);
})
사용자 인증을 위한 미들웨어 생성
미들웨어란?
미들웨어는 요청-응답 주기에서 요청, 응답 객체, 다음 기능에 접근할 수 있는 기능입니다. 함수 실행이 완료되면 다음 함수가 호출됩니다. 위에서 언급했듯이 다른 콜백 함수나 미들웨어 함수를 실행해야 할 때 next()를 사용합니다.
이제 미들웨어라는 폴더를 생성하고 그 안에 파일명을 auth.js로 생성하고 다음 코드를 작성합니다.
인증.js
const userModel = require('../models/userModel');
const jwt = require('jsonwebtoken');
const isAuthenticated = async (req,res,next)=>{
    try {
        const {token} = req.cookies;
        if(!token){
            return next('Please login to access the data');
        }
        const verify = await jwt.verify(token,process.env.SECRET_KEY);
        req.user = await userModel.findById(verify.id);
        next();
    } catch (error) {
       return next(error);
    }
}

module.exports = isAuthenticated;
이제 쿠키 파서 라이브러리를 설치하여 앱에서 cookieParser를 구성하십시오. cookieParser는 쿠키에 저장된 토큰에 액세스하는 데 도움이 됩니다. nodejs 앱에 cookieParser가 구성되어 있지 않으면 요청 객체의 헤더에서 쿠키에 액세스할 수 없습니다. 이제 쿠키 파서를 다운로드하기 위해 터미널에 작성하십시오.
npm i cookie-parser
이제 cookieParser가 설치되었습니다. index.js 파일을 수정하여 앱을 구성하고 “/user/” 경로에 미들웨어를 추가합니다.
index.js 파일
const cookieParser = require('cookie-parser');
const express = require('express');
const dotenv = require('dotenv');

//Configure dotenv files above using any other library and files
dotenv.config({path:'./config/config.env'});
require('./config/conn');
//Creating an app from express
const app = express();
const route = require('./routes/userRoute');

//Using express.json to get request of json data
app.use(express.json());
//Configuring cookie-parser
app.use(cookieParser());

//Using routes
app.use('/api', route);

//listening to the server
app.listen(process.env.PORT,()=>{
    console.log(`Server is listening at ${process.env.PORT}`);
})
userRoute.js
//Requiring all the necessary files and libraries
const express = require('express');
const bcrypt = require('bcryptjs');
const jwt = require('jsonwebtoken');
const isAuthenticated = require('../middleware/auth');

//Creating express router
const route = express.Router();
//Importing userModel
const userModel = require('../models/userModel');

//Creating user routes to fetch users data
route.get('/user', isAuthenticated, async (req, res) => {
    try {
        const user = await userModel.find();
        if (!user) {
            return res.json({ message: 'No user found' })
        }
        return res.json({ user: user })
    } catch (error) {
        return res.json({ error: error });
    }
})

module.exports = route;
“/user” 경로는 사용자가 로그인한 경우에만 액세스할 수 있습니다.
POSTMAN에서 API 확인
API를 확인하기 전에 package.json 파일을 수정해야 합니다. 다음 코드 줄을 추가합니다.
"scripts": {
    "test": "echo "Error: no test specified" && exit 1",
    "start": "node index.js",
    "dev": "nodemon index.js"
  },
npm start를 입력하여 서버를 시작할 수 있지만 한 번만 실행됩니다. 파일을 변경하는 동안 서버를 계속 실행하려면 nodemon이 필요합니다. 터미널에 입력하여 다운로드
npm install -g nodemon
-g 플래그는 로컬 시스템에서 전역적으로 nodemon을 다운로드합니다. 모든 새 프로젝트에 대해 반복해서 다운로드할 필요가 없습니다.
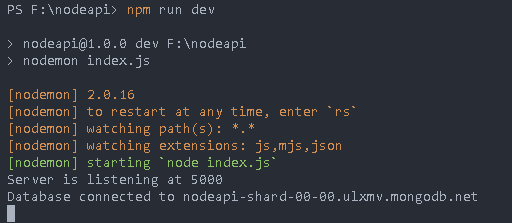
서버를 실행하려면 터미널에 npm run dev를 입력합니다. 다음과 같은 결과를 얻을 수 있습니다.
마지막으로 코드가 완료되고 서버가 올바르게 실행 중이면 우편 배달부로 이동하여 작동하는지 확인하십시오.
포스트맨이란?
POSTMAN은 API를 설계, 구축, 개발 및 테스트하는 소프트웨어 도구입니다.

컴퓨터에 우편 배달부를 다운로드하지 않은 경우 다음에서 다운로드하십시오. 우편 배달부 웹 사이트.
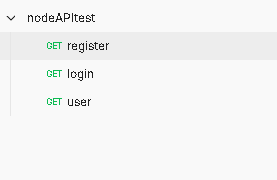
이제 우편 배달부를 열고 nodeAPItest라는 컬렉션 이름을 만들고 그 안에 등록, 로그인 및 사용자의 세 가지 요청을 만듭니다. 다음 파일이 있어야 합니다.
“localhost:5000/api/register”에 JSON 데이터를 보내면 다음과 같은 결과가 나옵니다.
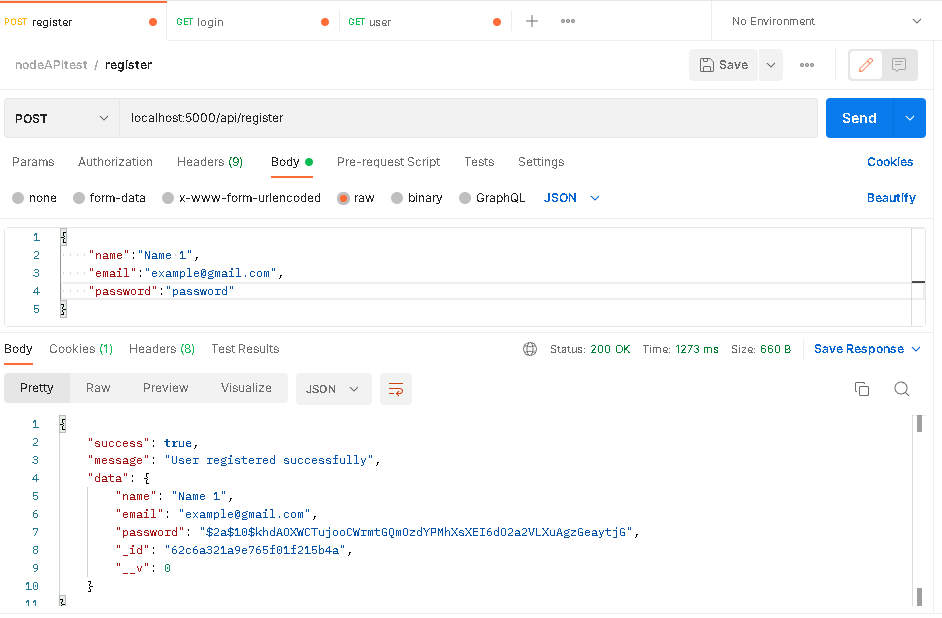
등록하는 동안에도 토큰을 생성하여 쿠키에 저장하므로 “localhost:5000/api/user” 경로를 요청할 때 사용자 세부 정보를 알 수 있습니다. 나머지 요청은 POSTMAN에서 확인할 수 있습니다.
전체 코드를 원하면 내에서 얻을 수 있습니다. 깃허브 계정.
결론
이 튜토리얼에서는 JWT 토큰을 사용하여 NodeJS API에 인증을 적용하는 방법을 배웠습니다. 또한 사용자가 사용자 데이터에 액세스할 수 있도록 승인했습니다.
해피 코딩!