
선호하는 OS에 Docker를 설치하기 위한 단계별 가이드입니다.
Docker는 자급식 휴대용 컨테이너에서 애플리케이션 빌드, 테스트, 배포 및 관리를 지원하는 오픈 소스 프로젝트입니다. 일반적으로 컨테이너 이미지에는 애플리케이션이 실행하는 데 필요한 모든 리소스가 있습니다.
오늘날 Docker는 호환성 문제를 극복하면서 애플리케이션을 컨테이너로 배포 및 관리하기 위한 인기 있는 도구가 되었습니다. 이 기술을 사용하면 기본 하드웨어 및 운영 체제에 관계없이 다양한 컴퓨터에 앱과 서비스를 설치할 수 있습니다. 따라서 Docker가 설치되어 있는 한 다른 컴퓨터 시스템에서 이러한 이미지를 실행할 수 있습니다. 일반적인 이미지에는 Nginx, MariaDB, WordPress 등이 있습니다.
Docker는 기존 VM과 다릅니다.
이 자습서에서는 다음 운영 체제에 Docker를 설치하는 방법을 배웁니다.
- 우분투
- 데비안
- CentOS
- 창
대부분의 경우 단계는 특정 OS에 대해 유사하지만 버전마다 약간의 차이가 있을 수 있습니다.
목차
도커 설치 방법
일반적으로 Docker 설치 방법은 크게 세 가지가 있으며 아래에서 설명하는 것처럼 상황과 환경에 따라 선택합니다.
- Docker 리포지토리 사용: – 대부분의 온라인 설치에 권장되는 간편한 설치 및 업그레이드 방법.
- 수동 다운로드, 설치 및 업그레이드: – 인터넷에 액세스할 수 없는 오프라인 컴퓨터에 적합
- 자동화된 스크립트 사용: 개발 및 테스트 환경용.
이 가이드에서는 Docker 리포지토리를 사용한 설치에 대해 설명합니다. 공식 Docker 리포지토리에서 도구를 설치하고 업그레이드하는 방법을 배우게 됩니다. 일반적으로 운영 체제의 리포지토리에서 파일을 다운로드할 수도 있지만 최신 버전이 아닐 수 있으므로 가능한 한 공식 Docker 소스를 사용해야 합니다.
우분투에 도커 설치
이 기사에서는 Ubuntu 18.04를 사용합니다.
전제 조건
1단계: 로컬 데이터베이스 업데이트
설치하기 전에 패키지의 기존 목록을 업데이트하여 시작하십시오.
sudo apt update
2단계: https를 지원하는 종속성 설치
https를 통해 파일을 전송할 수 있는 패키지 설치
sudo apt install apt-transport-https ca-certificates curl software-properties-common
이것은 각 명령이 수행하는 작업입니다.
- apt-transport-https: apt가 https를 통해 파일 및 데이터를 전송하도록 허용
- ca-certificates: 컴퓨터 또는 브라우저에서 보안 인증서를 확인하도록 합니다.
- curl: 파일 전송 도구
- software-properties-common: 소프트웨어 관리 스크립트를 추가합니다.
3단계: Docker의 GPG 키 추가
다음은 설치 파일이 인증되었는지 확인하는 보안 기능인 GPG 키를 추가하는 것입니다.
curl -fsSL https://download.docker.com/linux/ubuntu/gpg | sudo apt-key add –
4단계: Docker 리포지토리 설치
이 단계에서 아래 명령을 사용하여 apt 소스에 Docker 리포지토리를 추가합니다.
sudo add-apt-repository "deb [arch=amd64] https://download.docker.com/linux/ubuntu bionic stable"
5단계: 저장소 업데이트
방금 추가한 리포지토리의 Docker 패키지로 데이터베이스를 업데이트합니다.
sudo apt update
공식 Docker 저장소에서 설치를 실행하고 있는지 확인하려면 다음 명령을 실행하십시오.
apt-cache policy docker-ce
이것은 다음 출력을 제공해야합니다
apt-cache 정책 docker-ce의 출력
docker-ce:
  Installed: (none)
  Candidate: 5:19.03.5~3-0~ubuntu-bionic
  Version table:
 5:19.03.5~3-0~ubuntu-bionic 500
500 https://download.docker.com/linux/ubuntu bionic/stable amd64 Packages
 5:19.03.4~3-0~ubuntu-bionic 500
500 https://download.docker.com/linux/ubuntu bionic/stable amd64 Packages
 5:19.03.3~3-0~ubuntu-bionic 500
출력에서 docker-ce가 아직 설치되지 않았음을 알 수 있습니다. 그러나 출력에는 대상 운영 체제와 Docker 버전 번호가 표시됩니다. 버전 번호는 설치 시간에 따라 다를 수 있습니다.
6단계: 최신 버전의 Docker 설치
확인되면 다음 명령을 사용하여 Docker를 설치합니다.
sudo apt install docker-ce
그러면 Docker가 설치되고 데몬이 시작되며 부팅 시 자동으로 시작됩니다. Docker가 활성 상태이고 작동하는지 확인하려면 다음을 실행하십시오.
sudo systemctl status docker
성공적으로 설치되고 실행되면 명령은 다음 출력을 제공합니다.
    $ sudo systemctl status docker

● docker.service - Docker Application Container Engine
   Loaded: loaded (/lib/systemd/system/docker.service; enabled; vendor preset: e
   Active: active (running) since Sat 2019-12-14 07:46:40 UTC; 50s ago
 Docs: https://docs.docker.com
 Main PID: 2071 (dockerd)
Tasks: 8
   CGroup: /system.slice/docker.service
   └─2071 /usr/bin/dockerd -H fd:// --containerd=/run/containerd/contain
출력의 이 부분은 설치가 성공했으며 Docker가 활성화되어 실행 중임을 보여줍니다.
CentOS에 도커 설치
전제 조건
- CentOS 7의 안정적인 버전
- Sudo 사용자
가장 좋은 방법은 공식 Docker 리포지토리에서 최신 버전의 Docker 설치 패키지를 사용하는 것입니다.
1단계: 패키지 데이터베이스 업데이트
첫 번째 단계는 명령으로 패키지 데이터베이스를 업데이트하는 것입니다.
sudo yum update
2단계: Docker 저장소 추가 및 Docker 설치
업데이트 후 공식 Docker 저장소를 추가하고 최신 버전의 Docker를 다운로드하여 설치합니다. 이렇게 하려면 명령을 사용하십시오.
curl -fsSL https://get.docker.com/ | sh
3단계: Docker 시작 및 버전 확인
설치가 완료되면 Docker 데몬을 시작하십시오.
sudo systemctl start docker
Docker가 실행 중인지 확인
sudo systemctl status docker
이것은 다음과 같은 출력을 제공해야 합니다.
docker.service - Docker Application Container Engine
   Loaded: loaded (/usr/lib/systemd/system/docker.service; disabled; vendor preset: disabled)
   Active: active (running) since Mon 2019-12-09 09:54:50 UTC; 7s ago
 Docs: https://docs.docker.com
 Main PID: 9194 (dockerd)
Tasks: 8
   Memory: 44.0M
   CGroup: /system.slice/docker.service
   └─9194 /usr/bin/dockerd -H fd:// --containerd=/run/containerd/cont...
데비안에 도커 설치하기
최신 버전을 얻으려면 공식 Docker 저장소에서 설치하십시오.
전제 조건
1단계: 시스템 업데이트
먼저 설치된 패키지 목록을 업데이트합니다.
sudo apt update
2단계: Https를 통해 apt를 실행하는 데 필요한 패키지 설치
sudo apt install apt-transport-https ca-certificates curl gnupg2 software-properties-common
3단계: GPG 키 추가
이제 Docker의 GPG 키를 Debian 시스템에 추가해야 합니다. 이렇게 하면 다운로드가 유효한지 확인할 수 있습니다.
공식 Docker 저장소에 대한 GPG 키를 추가하려면 다음을 실행하십시오.
curl -fsSL https://download.docker.com/linux/debian/gpg | sudo apt-key add -
4단계: APT 소스에 Docker 리포지토리 추가
이 단계에서는 apt 소스에 Docker 리포지토리를 추가합니다.
sudo add-apt-repository "deb [arch=amd64] https://download.docker.com/linux/debian $(lsb_release -cs) stable"
5단계: 패키지 데이터베이스 업데이트
이제 방금 추가한 리포지토리의 Docker 패키지로 패키지 데이터베이스를 업데이트하겠습니다.
sudo apt update
6단계: 설치 소스 확인
아래 명령은 구식일 수 있는 Debian 대신 공식 Docker 저장소에서 Docker를 설치하고 있는지 확인합니다.
apt-cache policy docker-ce
그러면 아래와 유사한 출력이 반환됩니다. 그러나 Docker의 버전 번호는 다를 수 있습니다.
  Installed: (none)
  Candidate: 5:19.03.5~3-0~debian-stretch
  Version table:
 5:19.03.5~3-0~debian-stretch 500
500 https://download.docker.com/linux/debian stretch/stable amd64 Packages
 5:19.03.4~3-0~debian-stretch 500
500 https://download.docker.com/linux/debian stretch/stable amd64 Packages
 5:19.03.3~3-0~debian-stretch 500
500 https://download.docker.com/linux/debian stretch/stable amd64 Packages
 5:19.03.2~3-0~debian-stretch 500
500 https://download.docker.com/linux/debian stretch/stable amd64 Packages
..
..
..
17.03.1~ce-0~debian-stretch 500
500 https://download.docker.com/linux/debian stretch/stable amd64 Packages
 17.03.0~ce-0~debian-stretch 500
500 https://download.docker.com/linux/debian stretch/stable amd64 Packages
보시다시피 docker-ce는 아직 설치되지 않았습니다. 출력은 설치가 Debian 9(stretch)용 공식 Docker 리포지토리에서 가져온 것임을 보여줍니다.
7단계: Docker 설치
이제 아래 명령을 사용하여 Docker를 설치할 준비가 되었습니다.
sudo apt install docker-ce
그러면 Docker가 설치되고 엔진이 시작되며 항상 부팅 시 시작되도록 구성됩니다. 설치가 완료되면 실행 중인지 확인하십시오.
sudo systemctl status docker
성공적으로 설치된 경우 출력에 서비스가 활성 상태이고 실행 중임을 나타냅니다.
산출
● docker.service - Docker Application Container Engine
   Loaded: loaded (/lib/systemd/system/docker.service; enabled; vendor preset: e
   Active: active (running) since Mon 2019-12-09 11:48:32 UTC; 41s ago
 Docs: https://docs.docker.com
 Main PID: 17486 (dockerd)
   CGroup: /system.slice/docker.service
   └─17486 /usr/bin/dockerd -H fd:// --containerd=/run/containerd/contain
Windows에 Docker 설치
Windows Server 2016에 Docker Enterprise Edition을 설치하는 방법을 살펴보겠습니다.
1단계: Docker Powershell 모듈 설치
관리자 계정으로 Windows PowerShell 명령 프롬프트를 열고 아래 명령을 사용하여 DockerMsftProvider 모듈을 설치합니다. Docker 이미지를 찾고 설치하고 업데이트하기 위한 Docker Powershell 모듈입니다.
관리자 계정을 사용하는 경우 명령은 다음과 같이 표시됩니다.
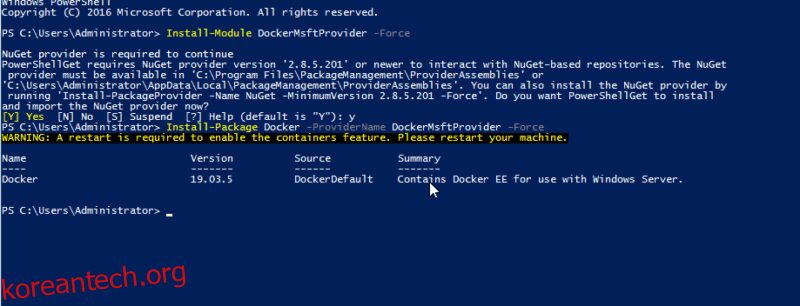
PS C:UsersAdministrator> install-module -name DockerMsftProvider -Force
그러면 아래와 같이 출력됩니다.
NuGet provider is required to continue
PowerShellGet requires NuGet provider version ‘2.8.5.201’ or newer to interact with NuGet-based repositories. The NuGet
provider must be available in ‘C:Program FilesPackageManagementProviderAssemblies’ or
‘C:UsersAdministratorAppDataLocalPackageManagementProviderAssemblies’. You can also install the NuGet provider by
running ‘Install-PackageProvider -Name NuGet -MinimumVersion 2.8.5.201 -Force’. Do you want PowerShellGet to install
and import the NuGet provider now?
[Y] Yes [N] No [S] Suspend [?] Help (default is “Y”): y
Type Y for Yes
2단계 도커 패키지 설치
모듈이 준비되면 이제 Docker 패키지를 설치할 준비가 되었습니다.
PS C:UsersAdministrator>Install-Package Docker –Providername DockerMsftProvider –Force
이렇게 하면 컴퓨터에 Docker 패키지가 설치되지만 서비스가 시작되지는 않습니다. 따라서 컨테이너 기능을 활성화하려면 컴퓨터를 다시 시작해야 합니다.
PS C:UsersAdministrator>Restart-Computer
다시 시작한 후 다음을 실행하여 설치 및 버전을 확인하십시오.
PS C:UsersAdministrator>docker-version
산출
Client: Docker Engine – Enterprise
Version: 19.03.5
API version: 1.40
Go version: go1.12.12
Git commit: 2ee0c57608
Built: 11/13/2019 08:00:16
OS/Arch: windows/amd64
Experimental: false
Server: Docker Engine – Enterprise
Engine:
Version: 19.03.5
API version: 1.40 (minimum version 1.24)
Go version: go1.12.12
Git commit: 2ee0c57608
Built: 11/13/2019 07:58:51
OS/Arch: windows/amd64
Experimental: false

PS C:UsersAdministrator>
일반적인 이미지로 Docker를 테스트하려면 다음 명령을 실행하십시오.
docker run hello-world:nanoserver-sac2016
제대로 설치되고 실행되면 명령은 다음과 같은 출력을 제공합니다.
PS C:UsersAdministrator> docker run hello-world:nanoserver-sac2016

Hello from Docker!
This message shows that your installation appears to be working correctly.
To generate this message, Docker took the following steps:
1. The Docker client contacted the Docker daemon.
2. The Docker daemon pulled the “hello-world” image from the Docker Hub.
(windows-amd64, nanoserver-sac2016)
3. The Docker daemon created a new container from that image which runs the
executable that produces the output you are currently reading.
4. The Docker daemon streamed that output to the Docker client, which sent it
to your terminal.
To try something more ambitious, you can run a Windows Server container with:
PS C:> docker run -it mcr.microsoft.com/windows/servercore powershell
Share images, automate workflows, and more with a free Docker ID:
https://hub.docker.com/
For more examples and ideas, visit:
https://docs.docker.com/get-started/
기본적으로 Windows 컨테이너 이미지를 사용해야 합니다. Linux 컨테이너 이미지를 실행해야 하는 경우 데스크톱 버전에서 사용할 수 있는 실험 모드에서 Docker Daemon을 사용합니다.
결론
이제 Docker를 설치하는 것이 얼마나 쉬운지 알게 되었기를 바랍니다. 설치한 후에는 사용하여 익숙해지고 비디오 기반 교육이 필요한 경우 이 항목을 확인하십시오. 강의.