

데이터 구조는 프로그래밍 세계에서 중요한 역할을 합니다. 효율적으로 사용할 수 있는 방식으로 데이터를 구성하는 데 도움이 됩니다.
이번 시간에는 단일 연결 리스트와 이중 연결 리스트에 대해 알아보겠습니다.
연결된 목록은 선형 데이터 구조입니다. 배열과 같은 연속 메모리 위치에 데이터를 저장하지 않습니다. 그리고 연결된 각 요소를 노드라고 하며 포인터를 사용하여 연결됩니다. 연결 리스트의 첫 번째 노드를 헤드라고 합니다.
연결된 목록의 크기는 동적입니다. 따라서 장치에서 스토리지를 사용할 수 없는 한 원하는 만큼 노드를 가질 수 있습니다.
연결된 목록에는 두 가지 유형이 있습니다. 그들에 대한 자세한 튜토리얼을 하나씩 봅시다.
목차
#1. 단일 연결 목록
단일 연결 목록에는 연결 목록의 다음 노드에 연결된 단일 포인터가 포함됩니다. 연결된 목록의 각 노드에 대한 데이터와 포인터를 저장해야 합니다.
연결된 목록의 마지막 노드에는 연결된 목록의 끝을 나타내는 다음 포인터로 null이 포함됩니다.
아래에 링크된 그림을 볼 수 있습니다.
이제 단일 연결 목록에 대해 완전히 이해했습니다. Python에서 구현하는 단계를 살펴보겠습니다.
단일 연결 목록 구현
1. 첫 번째 단계는 연결된 목록에 대한 노드를 만드는 것입니다.
그것을 만드는 방법?
Python에서는 클래스를 사용하여 노드를 쉽게 만들 수 있습니다. 이 클래스에는 데이터와 다음 노드에 대한 포인터가 포함되어 있습니다.
노드의 코드를 살펴보십시오.
class Node:

	def __init__(self, data):
		## data of the node
		self.data = data

		## next pointer
		self.next = None
위의 클래스를 사용하여 모든 유형의 데이터로 노드를 만들 수 있습니다. 우리는 그것을 조금 볼 수 있습니다.
이제 노드가 있습니다. 다음으로 여러 노드가 있는 연결 목록을 만들어야 합니다. 연결된 목록에 대한 또 다른 클래스를 만들어 봅시다.
2. Head가 None으로 초기화된 LinkedList라는 클래스를 만듭니다. 아래 코드를 참조하십시오.
class LinkedList:

	def __init__(self):
		## initializing the head with None
		self.head = None
3. Node와 LinkedList 클래스가 있습니다. 연결된 목록에 새 노드를 어떻게 삽입합니까? 간단한 대답은 LinkedList 클래스의 메서드를 사용하는 것일 수 있습니다. 그래, 좋겠어. 연결된 목록에 새 노드를 삽입하는 메서드를 작성해 보겠습니다.
연결된 목록에 새 노드를 삽입하려면 특정 단계를 따라야 합니다.
그들을 보자.
- 헤드가 비어 있는지 확인하십시오.
- 헤드가 비어 있으면 헤드에 새 노드를 할당합니다.
- 헤드가 비어 있지 않으면 연결된 목록의 마지막 노드를 가져옵니다.
- 새 노드를 마지막 노드 다음 포인터에 할당합니다.
연결된 목록에 새 노드를 삽입하는 코드를 살펴보겠습니다.
class LinkedList:

	####

	def insert(self, new_node):
		## check whether the head is empty or not
		if self.head:
			## getting the last node
			last_node = self.head
			while last_node != None:
				last_node = last_node.next

			## assigning the new node to the next pointer of last node
			last_node.next = new_node

		else:
			## head is empty
			## assigning the node to head
			self.head = new_node
만세! 연결 리스트에 새로운 노드를 삽입하는 방법을 완성했습니다. 연결된 목록에서 노드 데이터에 어떻게 액세스할 수 있습니까?
연결된 목록에서 데이터에 액세스하려면 삽입 방법에서 마지막 노드를 가져올 때와 마찬가지로 다음 포인터를 사용하여 연결된 항목을 반복해야 합니다. LinkedList 클래스 내부에 연결된 목록의 모든 노드 데이터를 인쇄하는 메서드를 작성해 보겠습니다.
4. 아래 단계에 따라 연결된 목록의 모든 노드 데이터를 인쇄합니다.
- head로 변수를 초기화합니다.
- 연결된 목록의 끝에 도달할 때까지 반복되는 루프를 작성합니다.
- 노드 데이터를 인쇄합니다.
- 다음 포인터 이동
코드를 보자.
class LinkedList:

	####

	def display(self):
		## variable for iteration
		temp_node = self.head

		## iterating until we reach the end of the linked list
		while temp_node != None:
			## printing the node data
			print(temp_node.data, end='->')

			## moving to the next node
			temp_node = temp_node.next

		print('Null')
휴! 필요한 메소드로 링크 생성을 완료했습니다. 일부 데이터로 연결 목록을 인스턴스화하여 연결 목록을 테스트해 보겠습니다.
Node(1) 코드로 노드를 생성할 수 있습니다. 샘플 사용법과 함께 연결된 목록 구현의 전체 코드를 살펴보겠습니다.
class Node:

	def __init__(self, data):
		## data of the node
		self.data = data

		## next pointer
		self.next = None

class LinkedList:

	def __init__(self):
		## initializing the head with None
		self.head = None

	def insert(self, new_node):
		## check whether the head is empty or not
		if self.head:
			## getting the last node
			last_node = self.head
			while last_node.next != None:
				last_node = last_node.next

			## assigning the new node to the next pointer of last node
			last_node.next = new_node

		else:
			## head is empty
			## assigning the node to head
			self.head = new_node

	def display(self):
		## variable for iteration
		temp_node = self.head

		## iterating until we reach the end of the linked list
		while temp_node != None:
			## printing the node data
			print(temp_node.data, end='->')

			## moving to the next node
			temp_node = temp_node.next

		print('Null')


if __name__ == '__main__':
	## instantiating the linked list
	linked_list = LinkedList()

	## inserting the data into the linked list
	linked_list.insert(Node(1))
	linked_list.insert(Node(2))
	linked_list.insert(Node(3))
	linked_list.insert(Node(4))
	linked_list.insert(Node(5))
	linked_list.insert(Node(6))
	linked_list.insert(Node(7))

	## printing the linked list
	linked_list.display()
위의 프로그램을 실행하여 다음 결과를 얻습니다.
1->2->3->4->5->6->7->Null
연결 리스트에 대한 내용입니다. 이제 단일 연결 목록을 구현하는 방법을 알았습니다. 단일 연결 리스트에 대한 지식으로 이중 연결 리스트를 쉽게 구현할 수 있습니다. 튜토리얼의 다음 섹션을 살펴보겠습니다.
#2. 이중 연결 목록
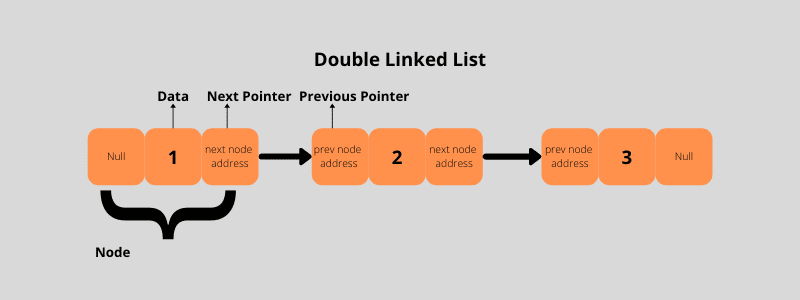
이중 연결 목록에는 연결 목록의 이전 노드와 다음 노드에 연결된 두 개의 포인터가 포함됩니다. 연결된 목록의 각 노드에 대한 데이터와 두 개의 포인터를 저장해야 합니다.
첫 번째 노드의 이전 포인터는 null이고 마지막 노드의 다음 포인터는 양쪽에서 연결된 목록의 끝을 나타내기 위해 null입니다.
아래에 링크된 그림을 볼 수 있습니다.
이중 연결 목록도 단일 연결 목록과 구현 단계가 비슷합니다. 같은 것을 다시 설명하면 지루할 것입니다. 각 단계의 코드를 살펴보면 매우 빠르게 이해할 수 있습니다. 갑시다.
이중 연결 리스트 구현
1. 이전 노드 포인터, 데이터 및 다음 노드 포인터를 사용하여 이중 연결 목록에 대한 노드를 생성합니다.
class Node:

	def __init__(self, data):
		## previous pointer
		self.prev = None

		## data of the node
		self.data = data

		## next pointer
		self.next = None
2. 이중 연결 리스트 클래스.
class LinkedList:

	def __init__(self):
		## initializing the head with None
		self.head = None
3. 이중 연결 리스트에 새로운 노드를 삽입하는 방법.
class LinkedList:

	####

	def insert(self, new_node):
		## check whether the head is empty or not
		if self.head:
			## getting the last node
			last_node = self.head
			while last_node.next != None:
				last_node = last_node.next

			## assigning the last node to the previous pointer of the new node
			new_node.prev = last_node

			## assigning the new node to the next pointer of last node
			last_node.next = new_node
4. 이중 연결 리스트 데이터를 표시하는 방법.
class LinkedList:

	####

	def display(self):

		## printing the data in normal order
		print("Normal Order: ", end='')

		temp_node = self.head
		while temp_node != None:
			print(temp_node.data, end=' ')
			temp_node = temp_node.next
		print()

		## printing the data in reverse order using previous pointer
		print("Reverse Order: ", end='')

		## getting the last node
		last_node = self.head
		while last_node.next != None:
			last_node = last_node.next

		temp_node = last_node
		while temp_node != None:
			print(temp_node.data, end=' ')
			temp_node = temp_node.prev
		print()
우리는 이중 연결 목록의 코드를 보았습니다. 그리고 이중 연결 목록 클래스를 사용하기 위한 코드가 없습니다. 그것은 당신을 위한 것입니다. 단일 연결 목록과 유사한 이중 연결 목록 클래스를 사용하십시오. 재미있게 보내세요 🙂
결론
연결된 목록을 기반으로 많은 문제를 찾을 수 있습니다. 하지만 이 자습서에서 배운 링크의 기본 구현을 알아야 합니다. 새로운 개념을 배우는 즐거운 시간이 되었기를 바랍니다.
행복한 코딩 🙂