9 Windows 관리를 위한 Ansible Playbooks 예
Ansible 플레이북을 활용한 원격 Windows 시스템 관리
Ansible은 현재 DevOps 환경에서 가장 널리 사용되는 자동화 도구 중 하나입니다. 이 도구는 Windows 서버 구성 및 관리를 위한 다양한 모듈을 제공합니다. 본 문서에서는 Ansible을 사용하여 원격 Windows 시스템에서 수행할 수 있는 여러 관리 작업을 예시와 함께 살펴봅니다.
시작하기 전에, Ansible 컨트롤러 시스템과 원격 Windows 서버가 네트워크로 연결되어 있고, Ansible이 컨트롤러 시스템에 설치되어 있다고 가정합니다. 여기서 Ansible 컨트롤러 시스템의 IP 주소는 192.168.0.106이며, 원격 Windows 시스템의 IP 주소는 192.168.0.102입니다.
연결 상태를 확인하기 위해 win_ping 모듈을 사용하여 원격 서버에 연결 테스트를 먼저 실행합니다.
[email protected] ~
$ ansible win -m win_ping
192.168.0.102 | SUCCESS => {
    "changed": false,
    "ping": "pong"
}
위 결과를 통해 원격 호스트와의 연결이 성공적으로 이루어졌음을 확인할 수 있습니다.
이제 몇 가지 Ansible 플레이북 예시를 살펴보겠습니다.
파일 복사
win_copy 모듈은 로컬 시스템에서 원격 Windows 시스템으로 파일을 전송하는 데 사용됩니다. 다음 YAML 코드는 단일 PDF 파일을 복사하는 예시입니다.
[email protected] ~
$ vi copy.yml
---
- hosts: win
  tasks:
    - name: Copy File
      win_copy:
        src: C:output.pdf
        dest: C:ansible_examples
        remote_src: yes
플레이북 실행 결과는 다음과 같습니다.
[email protected] ~
$ ansible-playbook copy.yml

PLAY [win] ***********************************************************************************************************************************

TASK [Gathering Facts] ***********************************************************************************************************************
ok: [192.168.0.102]

TASK [Copy File] *****************************************************************************************************************************
changed: [192.168.0.102]

PLAY RECAP ***********************************************************************************************************************************
192.168.0.102
: ok=2 changed=1 unreachable=0 failed=0
skipped=0 rescued=0 ignored=0
파일이 원격 Windows 시스템의 지정된 경로에 성공적으로 복사되었습니다.
MSI 설치 및 제거
MSI 파일을 사용하여 애플리케이션을 설치하려면, 먼저 win_get_url 모듈을 사용하여 MSI 파일을 다운로드하고, win_package 모듈을 사용하여 설치해야 합니다. state: present는 해당 애플리케이션이 시스템에 설치되어야 함을 의미합니다.
아래 예시는 Apache 웹 서버를 설치하는 과정을 보여줍니다.
[email protected] ~
$ vi msi.yml
---
- name: Installing Apache MSI
  hosts: win
  tasks:
    - name: Download the Apache installer
      win_get_url:
        url: https://archive.apache.org/dist/httpd/binaries/win32/httpd-2.2.25-win32-x86-no_ssl.msi
        dest: C:ansible_exampleshttpd-2.2.25-win32-x86-no_ssl.msi
    - name: Install MSI
      win_package:
        path: C:ansible_exampleshttpd-2.2.25-win32-x86-no_ssl.msi
        state: present
플레이북 실행 결과는 다음과 같습니다.
[email protected] ~
$ ansible-playbook msi.yml

PLAY [Installing Apache MSI] *****************************************************************************************************************

TASK [Gathering Facts] ***********************************************************************************************************************
ok: [192.168.0.102]

TASK [Download the Apache installer] *********************************************************************************************************
changed: [192.168.0.102]

TASK [Install MSI] ***************************************************************************************************************************
changed: [192.168.0.102]

PLAY RECAP ***********************************************************************************************************************************
192.168.0.102
: ok=3 changed=2 unreachable=0 failed=0
skipped=0 rescued=0 ignored=0
원격 시스템에서 Apache가 성공적으로 설치되었는지 확인합니다.
C:Userskoreantech.org>cd C:Program Files (x86)Apache Software FoundationApache2.2bin
C:Program Files (x86)Apache Software FoundationApache2.2bin>httpd -v
Server version: Apache/2.2.25 (Win32)
Server built: Jul 10 2013 01:52:12
또한, win_package 모듈에서 install, /passive, /norestart와 같은 인수를 사용하여 MSI를 설치할 수도 있습니다.
---
- name: Installing Apache MSI
  hosts: win
  tasks:
    - name: Download the Apache installer
      win_get_url:
        url: https://archive.apache.org/dist/httpd/binaries/win32/httpd-2.2.25-win32-x86-no_ssl.msi
        dest: C:ansible_exampleshttpd-2.2.25-win32-x86-no_ssl.msi
    - name: Install MSI
      win_package:
        path: C:ansible_exampleshttpd-2.2.25-win32-x86-no_ssl.msi
        arguments:
          - /install
          - /passive
          - /norestart
애플리케이션을 제거하기 위해서는 win_package 모듈을 사용하고, state: absent로 설정하면 됩니다.
Apache를 제거하는 예시는 다음과 같습니다.
[email protected] ~
$ vi uninstall_msi.yml
---
- name: UnInstalling Apache MSI
  hosts: win
  tasks:
    - name: UnInstall MSI
      win_package:
        path: C:ansible_exampleshttpd-2.2.25-win32-x86-no_ssl.msi
        state: absent
플레이북 실행 결과는 다음과 같습니다.
[email protected] ~
$ ansible-playbook uninstall_msi.yml

PLAY [UnInstalling Apache MSI] *****************************************************************************************************************

TASK [Gathering Facts] ***********************************************************************************************************************
ok: [192.168.0.102]

TASK [UnInstall MSI] *************************************************************************************************************************
changed: [192.168.0.102]

PLAY RECAP ***********************************************************************************************************************************
192.168.0.102
: ok=2 changed=1 unreachable=0 failed=0
skipped=0 rescued=0 ignored=0
Apache가 성공적으로 제거되었는지 확인합니다.
C:Program Files (x86)Apache Software FoundationApache2.2bin>httpd -v 'httpd' is not recognized as an internal or external command,
operable program or batch file.
소프트웨어 (.exe) 제거
win_package 모듈을 사용하여 .exe 파일을 기반으로 소프트웨어를 제거할 수도 있습니다. 이때 해당 소프트웨어의 제품 ID가 필요합니다.
[email protected] ~
$ vi uninstall.yml
---
- hosts: win
  tasks:
    - name: Uninstall 7-Zip from the exe
      win_package:
        path: C:Program Files7-ZipUninstall.exe
        product_id: 7-Zip
        arguments: /S
        state: absent
플레이북 실행 결과는 다음과 같습니다.
[email protected] ~
$ ansible-playbook uninstall.yml

PLAY [win] *************************************************************************************************************************************************************************************

TASK [Gathering Facts] *************************************************************************************************************************************************************************
ok: [192.168.0.102]

TASK [Uninstall 7-Zip from the exe] ***********************************************************************************************************************************************************
changed: [192.168.0.102]

PLAY RECAP *************************************************************************************************************************************************************************************
192.168.0.102              : ok=2    changed=1    unreachable=0    failed=0    skipped=0    rescued=0    ignored=0
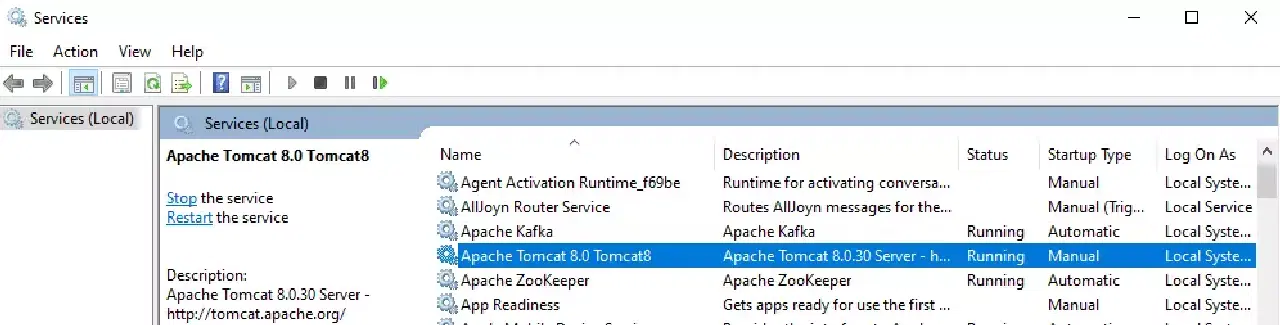
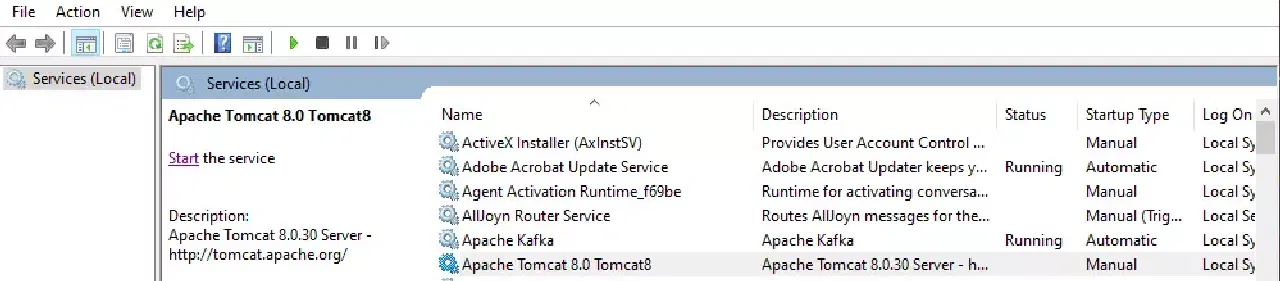
Windows 서비스 제어
win_service 모듈은 Windows 서비스를 시작, 중지 또는 재시작하는 데 사용됩니다. 다음은 Tomcat 서비스를 중지하는 예시입니다.
[email protected] ~
$ vi service.yml
---
- hosts: win
  tasks:
    - name: Stop service Tomcat
      win_service:
        name: Tomcat8
        state: stopped
플레이북 실행 결과는 다음과 같습니다.
[email protected] ~
$ ansible-playbook service.yml

PLAY [win] ***********************************************************************************************************************************

TASK [Gathering Facts] ***********************************************************************************************************************
ok: [192.168.0.102]

TASK [Stop service Tomcat] ****************************************************************************************************************
changed: [192.168.0.102]

PLAY RECAP ***********************************************************************************************************************************
192.168.0.102
: ok=2 changed=1 unreachable=0 failed=0
skipped=0 rescued=0 ignored=0
Windows 시스템에서 Tomcat 서비스가 중지된 상태임을 확인할 수 있습니다.
서비스 상태는 started, restarted 또는 paused로 변경할 수 있습니다.
시스템 정보 수집
win_disk_facts 모듈을 사용하여 원격 호스트의 디스크 정보를 수집할 수 있습니다.
[email protected] ~
$ vi disk.yml
---
- hosts: win
  tasks:
    - name: Get disk facts
      win_disk_facts:
    - name: Output first disk size
      debug:
        var: ansible_facts.disks[0].size
    - name: Convert first system disk into various formats
      debug:
        msg: '{{ disksize_gib }} vs {{ disksize_gib_human }}'
      vars:
        disk: '{{ ansible_facts.disks|selectattr("system_disk")|first }}'
        disksize_gib_human: '{{ disk.size|filesizeformat(true) }}'
        disksize_gib: '{{ (disk.size/1024|pow(3))|round|int }} GiB'
플레이북 실행 결과는 다음과 같습니다.
[email protected] ~
$ ansible-playbook disk.yml

PLAY [win] ***********************************************************************************************************************************

TASK [Gathering Facts] ***********************************************************************************************************************
ok: [192.168.0.102]

TASK [Get disk facts] ************************************************************************************************************************
ok: [192.168.0.102]

TASK [Output first disk size] ****************************************************************************************************************
ok: [192.168.0.102] => {
"ansible_facts.disks[0].size": "1000204886016"
}

TASK [Convert first system disk into various formats] ****************************************************************************************
ok: [192.168.0.102] => {
"msg": "932 GiB vs 931.5 GiB"
}

PLAY RECAP ***********************************************************************************************************************************
192.168.0.102
: ok=4 changed=0 unreachable=0 failed=0
skipped=0 rescued=0 ignored=0
또한 win_command 모듈을 사용하여 원격 호스트에서 명령을 실행하고 CPU 정보와 같은 세부 정보를 얻을 수 있습니다.
[email protected] ~
$ vi check.yml
---
- hosts: win
  tasks:
    - name: Get disk facts
      win_command: wmic cpu get caption, deviceid, name, numberofcores, maxclockspeed, status
      register: usage
    - debug: msg="{{ usage.stdout }}"
플레이북 실행 결과는 다음과 같습니다.
[email protected] ~
$ ansible-playbook check.yml

PLAY [win] ***********************************************************************************************************************************

TASK [Gathering Facts] ***********************************************************************************************************************
ok: [192.168.0.102]

TASK [Get facts] ************************************************************************************************************************
changed: [192.168.0.102]

TASK [debug] *********************************************************************************************************************************
ok: [192.168.0.102] => {
"msg": "Caption DeviceID MaxClockSpeed
Name
NumberOfCores Status rrnIntel64 Family 6 Model 142 Stepping 9 CPU0 2712 Intel(R) Core(TM) i5-7200U CPU @ 2.50GHz 2 OK rrnrrn"
}

PLAY RECAP ***********************************************************************************************************************************
192.168.0.102
: ok=3 changed=1 unreachable=0 failed=0
skipped=0 rescued=0
ignored=0
명령 실행
win_command 모듈은 원격 Windows 시스템에서 명령을 실행하는 데 사용됩니다. 다음은 디렉토리를 생성하는 예시입니다.
[email protected] ~
$ vi commands.yml
---
- hosts: win
  tasks:
    - name: run an executable using win_command
      win_command: whoami.exe
    - name: run a cmd command
      win_command: cmd.exe /c mkdir C:test
플레이북 실행 결과는 다음과 같습니다.
[email protected] ~
$ ansible-playbook commands.yml

PLAY [win] ***********************************************************************************************************************************

TASK [Gathering Facts] ***********************************************************************************************************************
ok: [192.168.0.102]

TASK [run an executable using win_command] ***************************************************************************************************
changed: [192.168.0.102]

TASK [run a cmd command] *********************************************************************************************************************
changed: [192.168.0.102]

PLAY RECAP ***********************************************************************************************************************************
192.168.0.102
: ok=3 changed=2 unreachable=0 failed=0
skipped=0 rescued=0 ignored=0
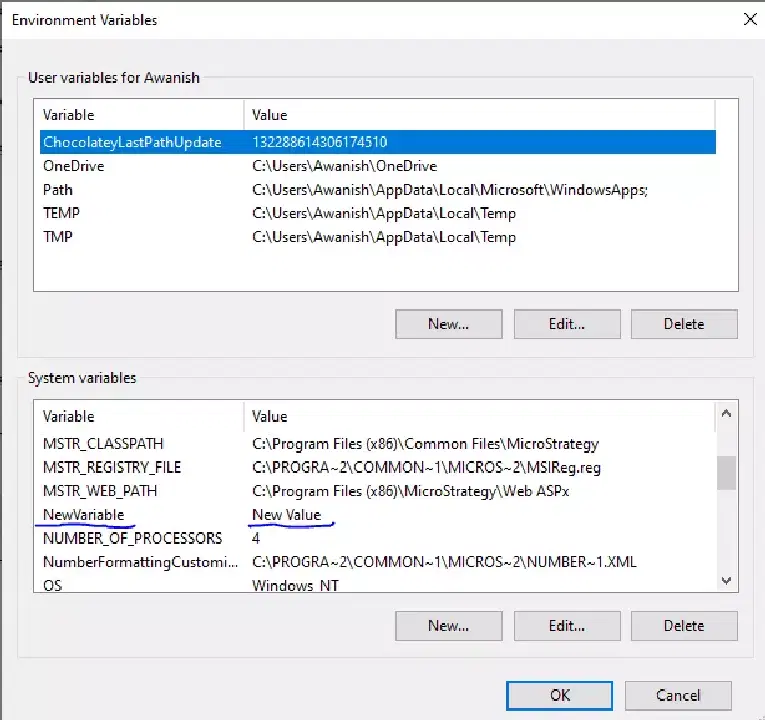
환경 변수 설정
win_environment 모듈을 사용하면 Windows 시스템의 환경 변수를 관리할 수 있습니다. 여기서는 새로운 환경 변수를 추가하는 예시를 보여줍니다.
[email protected] ~
$ vi env.yml
---
- hosts: win
  tasks:
    - name: Set an environment variable for all users
      win_environment:
        state: present
        name: NewVariable
        value: New Value
        level: machine
플레이북 실행 결과는 다음과 같습니다.
[email protected] ~
$ ansible-playbook env.yml

PLAY [win] ***********************************************************************************************************************************

TASK [Gathering Facts] ***********************************************************************************************************************
ok: [192.168.0.102]

TASK [Set an environment variable for all users] *********************************************************************************************
changed: [192.168.0.102]

PLAY RECAP ***********************************************************************************************************************************
192.168.0.102
: ok=2 changed=1 unreachable=0 failed=0
skipped=0 rescued=0 ignored=0
원격 시스템 환경 변수 설정 창에서 새 변수가 추가된 것을 확인할 수 있습니다.
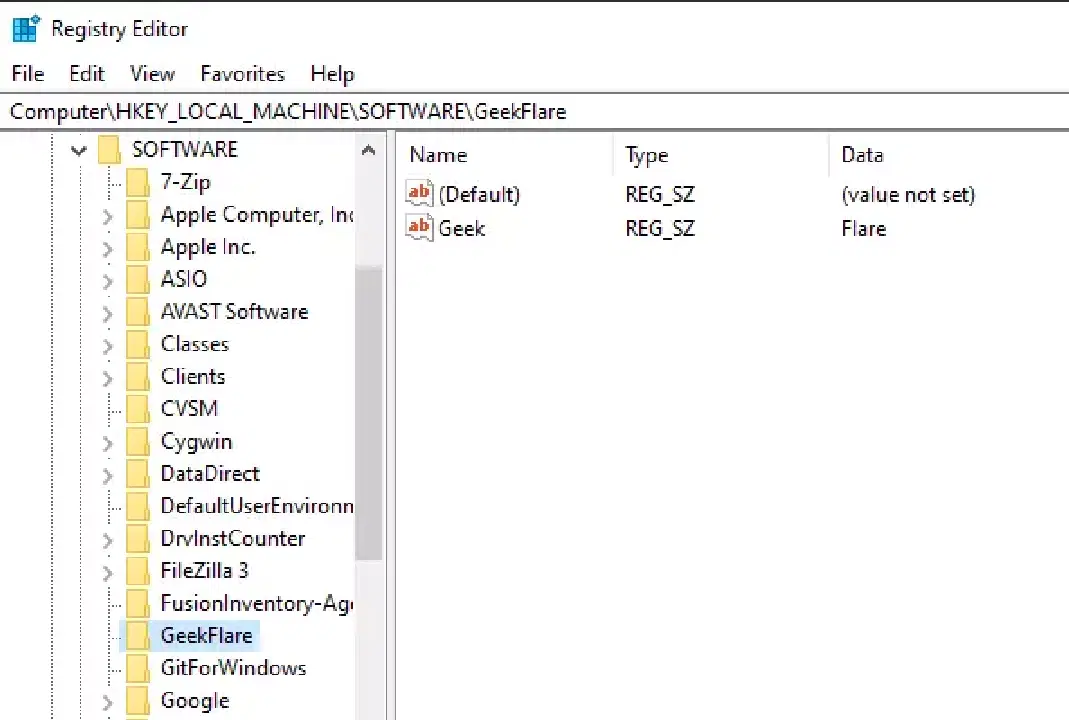
레지스트리 추가 및 편집
win_regedit 모듈은 원격 Windows 시스템에서 레지스트리를 추가하거나 편집하는 데 사용됩니다. 다음은 레지스트리를 생성하고 값을 설정하는 예시입니다.
[email protected] ~
$ vi registry.yml
---
- hosts: win
  tasks:
    - name: Creating a registry
      win_regedit:
        path: HKLM:SOFTWAREkoreantech.org
    - name: Modifying a registry, adding name and data
      win_regedit:
        path: HKLM:SOFTWAREkoreantech.org
        name: Geek
        data: Flare
플레이북 실행 결과는 다음과 같습니다.
[email protected] ~
$ ansible-playbook registry.yml

PLAY [win] ***********************************************************************************************************************************

TASK [Gathering Facts] ***********************************************************************************************************************
ok: [192.168.0.102]

TASK [Creating a registry] *******************************************************************************************************************
changed: [192.168.0.102]

TASK [Modifying a registry, adding name and data] ********************************************************************************************
changed: [192.168.0.102]

PLAY RECAP ***********************************************************************************************************************************
192.168.0.102
: ok=3 changed=2 unreachable=0 failed=0
skipped=0 rescued=0 ignored=0
레지스트리 편집기에서 해당 레지스트리가 성공적으로 추가되었는지 확인할 수 있습니다.
로그 삭제
win_eventlog 모듈을 사용하여 Windows 시스템의 이벤트 로그를 관리할 수 있습니다. 먼저 Powershell을 사용하여 원격 시스템의 이벤트 로그를 나열합니다.
PS C:Userskoreantech.org> Get-EventLog -List
  Max(K) Retain OverflowAction        Entries Log
  ------ ------ --------------        ------- ---
  20,480      0 OverwriteAsNeeded      33,549 Application
  20,480      0 OverwriteAsNeeded           0 HardwareEvents
     512      7 OverwriteOlder             20 Internet Explorer
  20,480      0 OverwriteAsNeeded           0 Key Management Service
     128      0 OverwriteAsNeeded         190 OAlerts
                                              Security
  20,480      0 OverwriteAsNeeded      44,828 System
  15,360      0 OverwriteAsNeeded       3,662 Windows PowerShell
다음은 Internet Explorer 로그를 제거하는 예시입니다.
[email protected] ~
$ vi log.yml
---
- hosts: win
  tasks:
    - name: Remove Internet Explorer Logs
      win_eventlog:
        name: Internet Explorer
        state: absent
플레이북 실행 결과는 다음과 같습니다.
[email protected] ~
$ ansible-playbook log.yml

PLAY [win] *************************************************************************************************************************************************************************************

TASK [Gathering Facts] *************************************************************************************************************************************************************************
ok: [192.168.0.102]

TASK [Remove Internet Explorer Logs] **********************************************************************************************************************************************
changed: [192.168.0.102]

PLAY RECAP *************************************************************************************************************************************************************************************
192.168.0.102              : ok=2    changed=1    unreachable=0    failed=0    skipped=0    rescued=0    ignored=0
이벤트 로그를 다시 나열하면 Internet Explorer 로그가 제거된 것을 확인할 수 있습니다.
PS C:Userskoreantech.org> Get-EventLog -List

  Max(K) Retain OverflowAction        Entries Log
  ------ ------ --------------        ------- ---
  20,480      0 OverwriteAsNeeded      33,549 Application
  20,480      0 OverwriteAsNeeded           0 HardwareEvents
  20,480      0 OverwriteAsNeeded           0 Key Management Service
     128      0 OverwriteAsNeeded         190 OAlerts
                                              Security
  20,480      0 OverwriteAsNeeded      44,835 System
  15,360      0 OverwriteAsNeeded          56 Windows PowerShell
지금까지 Ansible 플레이북을 사용하여 원격 Windows 시스템을 관리하는 다양한 방법을 살펴보았습니다. 제공된 예시 외에도, Ansible Windows 모듈 문서를 참고하여 다양한 기능을 활용해 보시기 바랍니다.