초보자를 위한 Terraform 소개 – Terraform 튜토리얼
테라폼(Terraform)이란 무엇일까요?
IaC(Infrastructure as Code)는 DevOps 전문가들 사이에서 흔히 사용되는 용어입니다. 이는 사람이 아닌 기계가 읽을 수 있는 정의 파일을 사용하여 물리적, 가상 기계 모두를 포함하는 전체 IT 인프라를 관리하고 프로비저닝하는 과정을 의미합니다. 즉, 운영에 대한 소프트웨어 엔지니어링 접근 방식이며, 프로그래밍 스크립트를 통해 데이터 센터 전체를 자동화하는 데 도움을 줍니다.
IaC가 제공하는 다양한 기능에도 불구하고 다음과 같은 몇 가지 문제점이 있습니다.
- 새로운 코딩 기술을 익혀야 합니다.
- 변경 사항이 미치는 영향을 예측하기 어렵습니다.
- 변경 사항을 되돌리는 과정이 복잡할 수 있습니다.
- 변경 이력을 추적하기가 쉽지 않습니다.
- 리소스 자동화에 어려움이 있습니다.
- 인프라를 위한 다양한 환경을 관리하기가 어렵습니다.
테라폼은 바로 이러한 문제들을 해결하기 위해 개발되었습니다.
테라폼(Terraform)이란?
테라폼은 HashiCorp에서 개발한 오픈 소스 인프라 코드화(IaC) 도구입니다. 사용하기 쉬운 선언적 언어를 사용하여 전체 인프라를 정의하고 프로비저닝할 수 있도록 설계되었습니다. 테라폼 공식 웹사이트에서 더 자세한 정보를 얻을 수 있습니다.
테라폼은 클라우드 인프라 설정을 코드로 저장할 수 있게 해주는 인프라 프로비저닝 도구입니다. AWS 인프라 자동화에 사용되는 클라우드포메이션(CloudFormation)과 매우 유사하지만, 클라우드포메이션은 AWS 환경에서만 사용 가능한 반면, 테라폼은 다양한 클라우드 플랫폼에서 활용할 수 있다는 장점이 있습니다.
테라폼을 사용하는 데에는 다음과 같은 이점이 있습니다.
- 단순한 구성 관리뿐 아니라 오케스트레이션 기능 수행
- AWS, Azure, GCP, DigitalOcean 등 다양한 공급자 지원
- 구성이 매끄럽게 변경되는 불변 인프라 제공
- 이해하기 쉬운 언어인 HCL(HashiCorp Configuration Language) 사용
- 다른 공급자로의 간편한 이식성 제공
- 클라이언트 전용 아키텍처를 지원하여 서버 측 추가 구성 관리 불필요
테라폼 핵심 개념
테라폼에서 사용되는 주요 개념과 용어는 다음과 같습니다.
- 변수(Variables): 입력 변수로도 사용되며, 테라폼 모듈에서 사용자 정의를 가능하게 하는 키-값 쌍입니다.
- 공급자(Provider): 서비스의 API와 상호 작용하여 관련 리소스에 액세스하는 플러그인입니다.
- 모듈(Module): 모든 구성이 정의된 테라폼 템플릿이 있는 폴더입니다.
- 상태(State): 테라폼에서 관리하는 인프라와 관련된 구성 정보를 캐시하여 저장합니다.
- 리소스(Resource): 인프라 구성 및 관리에 사용되는 하나 이상의 인프라 객체 (컴퓨팅 인스턴스, 가상 네트워크 등) 블록을 의미합니다.
- 데이터 소스(Data Source): 외부 객체에 대한 정보를 테라폼에 반환하기 위해 공급자가 구현합니다.
- 출력 값(Output Values): 다른 구성에서 사용할 수 있는 테라폼 모듈의 반환 값입니다.
- 계획(Plan): 인프라의 실제/현재 상태에서 원하는 상태로 이동하기 위해 어떤 항목을 생성, 업데이트 또는 삭제해야 하는지 결정하는 단계입니다.
- 적용(Apply): 계획 단계에서 결정된 변경 사항을 인프라의 실제/현재 상태에 적용하여 원하는 상태로 만드는 단계입니다.
테라폼 생명 주기
테라폼의 생명 주기는 초기화(init), 계획(plan), 적용(apply) 및 파괴(destroy) 단계로 구성됩니다.
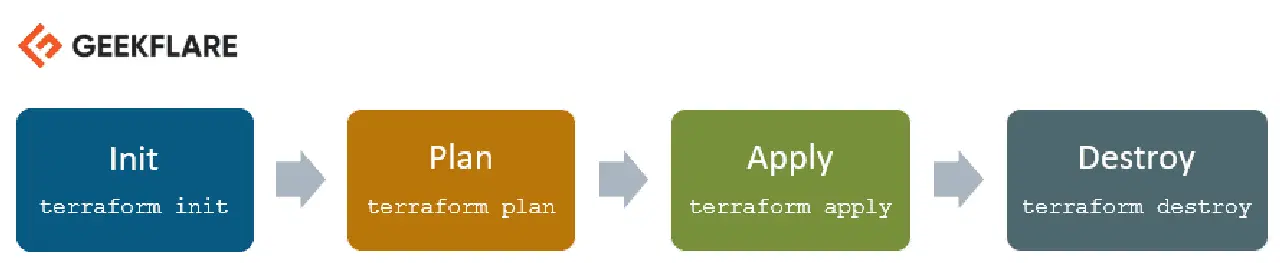
- Terraform init: 모든 구성 파일이 포함된 작업 디렉토리를 초기화합니다.
- Terraform plan: 인프라의 원하는 상태에 도달하기 위한 실행 계획을 생성합니다. 이 단계에서 구성 파일의 변경 사항을 확인합니다.
- Terraform apply: 계획 단계에서 정의된 대로 인프라를 변경하여 원하는 상태를 만듭니다.
- Terraform destroy: 적용 단계 후 오염된 것으로 표시된 이전 인프라 리소스를 삭제하는 데 사용됩니다.
테라폼은 어떻게 작동할까요?
테라폼 아키텍처는 크게 두 가지 핵심 구성 요소로 이루어져 있습니다.

테라폼 코어
테라폼 코어는 두 가지 입력 소스를 사용하여 작업을 수행합니다.
첫 번째 입력 소스는 사용자가 구성한 테라폼 구성입니다. 여기에는 생성하거나 프로비저닝해야 할 항목들이 정의되어 있습니다. 두 번째 입력 소스는 인프라의 현재 상태에 대한 최신 정보를 담고 있는 상태입니다.
테라폼 코어의 역할은 이 두 입력을 받아 어떤 계획을 실행해야 할지를 파악하는 것입니다. 즉, 현재 상태와 원하는 구성을 비교하여 구성 파일에 정의된 최종 상태에 도달하기 위해 어떤 작업들이 필요한지 결정합니다. 생성해야 할 항목, 업데이트해야 할 항목, 삭제해야 할 항목들을 파악하여 인프라를 생성하고 프로비저닝합니다.
공급자
아키텍처의 두 번째 구성 요소는 특정 기술에 대한 공급자입니다. 이러한 공급자는 AWS, Azure, GCP와 같은 클라우드 서비스 제공자일 수도 있고, Kubernetes와 같은 플랫폼 서비스(PaaS) 도구일 수도 있으며, 심지어 일부 소프트웨어를 셀프 서비스 도구로 제공하는 공급자일 수도 있습니다.
공급자를 통해 다양한 수준에서 인프라를 생성할 수 있습니다. 예를 들어, AWS 인프라를 생성한 다음 그 위에 Kubernetes를 배포하고, 해당 Kubernetes 클러스터 내부에 서비스 또는 구성 요소를 생성하는 것이 가능합니다.
테라폼은 다양한 기술에 대한 100개 이상의 공급자를 제공하며, 각 공급자는 테라폼 사용자에게 해당 리소스에 대한 접근 권한을 부여합니다. 예를 들어, AWS 공급자를 통해 EC2 인스턴스, AWS 사용자 등 수많은 AWS 리소스에 액세스할 수 있으며, Kubernetes 공급자를 통해 Pod, 서비스, 배포, 네임스페이스 등과 같은 리소스에 액세스할 수 있습니다.
이것이 바로 테라폼이 작동하는 방식이며, 인프라부터 애플리케이션까지 전체 애플리케이션 설정을 프로비저닝하고 관리하는 데 도움을 줍니다.
이제 실제 작업을 해보겠습니다. 👨💻
Ubuntu에 테라폼을 설치하고 기본적인 인프라를 프로비저닝해 보겠습니다.
테라폼 설치
최신 테라폼 패키지를 다운로드합니다.
자신의 OS에 맞는 최신 버전을 다운로드하려면 공식 다운로드 페이지를 참조하십시오.
[email protected]:~$ wget https://releases.hashicorp.com/terraform/0.13.0/terraform_0.13.0_linux_amd64.zip
--2020-08-14 16:55:38--  https://releases.hashicorp.com/terraform/0.13.0/terraform_0.13.0_linux_amd64.zip
Resolving releases.hashicorp.com (releases.hashicorp.com)... 151.101.153.183, 2a04:4e42:24::439
Connecting to releases.hashicorp.com (releases.hashicorp.com)|151.101.153.183|:443... connected.
HTTP request sent, awaiting response... 200 OK
Length: 34851622 (33M) [application/zip]
Saving to: ‘terraform_0.13.0_linux_amd64.zip’

terraform_0.13.0_linux_amd64.zip
100%[=================================================================>] 33.24M  90.3KB/s   in 5m 28s

2020-08-14 17:01:06 (104 KB/s) - ‘terraform_0.13.0_linux_amd64.zip’ saved [34851622/34851622]
다운로드한 패키지의 압축을 해제합니다.
[email protected]:~$ unzip terraform_0.13.0_linux_amd64.zip
Archive:  terraform_0.13.0_linux_amd64.zip
  inflating: terraform
테라폼 실행 파일을 아래 표시된 경로로 이동하고 테라폼 버전을 확인합니다.
[email protected]:~$ sudo mv terraform /usr/local/bin/
[sudo] password for koreantech.org:
[email protected]:~$ terraform -v
Terraform v0.13.0
테라폼에서 사용 가능한 명령을 확인합니다.
[email protected]:~$ terraform
Usage: terraform [-version] [-help] <command> [args]

The available commands for execution are listed below.
The most common, useful commands are shown first, followed by
less common or more advanced commands. If you're just getting
started with Terraform, stick with the common commands. For the
other commands, please read the help and docs before usage.

Common commands:
    apply      Builds or changes infrastructure
    console    Interactive console for Terraform interpolations
    destroy    Destroy Terraform-managed infrastructure
    env        Workspace management
    fmt        Rewrites config files to canonical format
    get        Download and install modules for the configuration
    graph      Create a visual graph of Terraform resources
    import     Import existing infrastructure into Terraform
    init       Initialize a Terraform working directory
    login      Obtain and save credentials for a remote host
    logout     Remove locally-stored credentials for a remote host
    output     Read an output from a state file
    plan       Generate and show an execution plan
    providers  Prints a tree of the providers used in the configuration
    refresh    Update local state file against real resources
    show       Inspect Terraform state or plan
    taint      Manually mark a resource for recreation
    untaint    Manually unmark a resource as tainted
    validate   Validates the Terraform files
    version    Prints the Terraform version
    workspace  Workspace management

All other commands:
    0.12upgrade  Rewrites pre-0.12 module source code for v0.12
    0.13upgrade  Rewrites pre-0.13 module source code for v0.13
    debug        Debug output management (experimental)
    force-unlock Manually unlock the terraform state
    push         Obsolete command for Terraform Enterprise legacy (v1)
    state        Advanced state management
테라폼을 사용하여 AWS EC2 인스턴스 프로비저닝
이번 데모에서는 테라폼을 사용하여 새로운 AWS EC2 인스턴스를 시작해 보겠습니다.
테라폼 데모를 위한 작업 디렉터리를 생성합니다.
[email protected]:~$ mkdir terraform_demo
디렉터리로 이동하여 AWS EC2 인스턴스를 시작하기 위한 공급자와 리소스를 정의하는 테라폼 구성 파일을 생성합니다.
[email protected]:~$ cd terraform_demo/
[email protected]:~/terraform_demo$ gedit awsec2.tf

provider "aws" {
  access_key = "B5KG6Fe5GUKIATUF5UD"
  secret_key = "R4gb65y56GBF6765ejYSJA4YtaZ+T6GY7H"
  region     = "us-west-2"
}

resource "aws_instance" "terraform_demo" {
  ami           = "ami-0a634ae95e11c6f91"
  instance_type = "t2.micro"
}
참고: 액세스 키와 비밀 키는 임의로 변경되었으니, 실제로는 본인의 키를 사용해야 합니다. 😛
위 구성에서 AWS와 같은 공급자를 언급하고 있습니다. 공급자 내부에서 AWS 사용자 자격 증명과 인스턴스를 시작해야 하는 리전을 지정하고 있습니다.
리소스 섹션에서는 Ubuntu(ami-0a634ae95e11c6f91)의 AMI 세부 정보를 제공하고 있으며, 인스턴스 유형이 t2.micro여야 한다고 명시하고 있습니다.
코드를 작성하는 사람이 아니더라도 구성 파일이 얼마나 쉽고 읽기 쉬운지 알 수 있습니다.
테라폼 초기화
이제 첫 번째 단계로 테라폼을 초기화합니다.
[email protected]:~/terraform_demo$ terraform init

Initializing the backend...

Initializing provider plugins...
- Using previously-installed hashicorp/aws v3.2.0

The following providers do not have any version constraints in configuration,
so the latest version was installed.

To prevent automatic upgrades to new major versions that may contain breaking
changes, we recommend adding version constraints in a required_providers block
in your configuration, with the constraint strings suggested below.

* hashicorp/aws: version = "~> 3.2.0"

Terraform has been successfully initialized!

You may now begin working with Terraform. Try running "terraform plan" to see
any changes that are required for your infrastructure. All Terraform commands
should now work.

If you ever set or change modules or backend configuration for Terraform,
rerun this command to reinitialize your working directory. If you forget, other
commands will detect it and remind you to do so if necessary.
테라폼 계획
다음 단계는 계획 단계입니다. 이 단계에서는 인프라 생성 및 프로비저닝을 위한 실행 그래프를 생성합니다.
[email protected]:~/terraform_demo$ terraform plan
Refreshing Terraform state in-memory prior to plan...
The refreshed state will be used to calculate this plan, but will not be
persisted to local or remote state storage.

------------------------------------------------------------------------

An execution plan has been generated and is shown below.
Resource actions are indicated with the following symbols:
  + create

Terraform will perform the following actions:

  # aws_instance.terraform_demo will be created
  + resource "aws_instance" "terraform_demo" {
      + ami                                  = "ami-0a634ae95e11c6f91"
      + arn                                  = (known after apply)
      + associate_public_ip_address          = (known after apply)
      + availability_zone                    = (known after apply)
      + cpu_core_count                       = (known after apply)
      + cpu_threads_per_core                 = (known after apply)
      + get_password_data                    = false
      + host_id                              = (known after apply)
      + id                                   = (known after apply)
      + instance_state                       = (known after apply)
      + instance_type                        = "t2.micro"
      + ipv6_address_count                   = (known after apply)
      + ipv6_addresses                       = (known after apply)
      + key_name                             = (known after apply)
      + outpost_arn                          = (known after apply)
      + password_data                        = (known after apply)
      + placement_group                      = (known after apply)
      + primary_network_interface_id         = (known after apply)
      + private_dns                          = (known after apply)
      + private_ip                           = (known after apply)
      + public_dns                           = (known after apply)
      + public_ip                            = (known after apply)
      + secondary_private_ips                = (known after apply)
      + security_groups                      = (known after apply)
      + source_dest_check                    = true
      + subnet_id                            = (known after apply)
      + tenancy                              = (known after apply)
      + volume_tags                          = (known after apply)
      + vpc_security_group_ids               = (known after apply)

      + ebs_block_device {
          + delete_on_termination            = (known after apply)
          + device_name                      = (known after apply)
          + encrypted                        = (known after apply)
          + iops                             = (known after apply)
          + kms_key_id                       = (known after apply)
          + snapshot_id                      = (known after apply)
          + volume_id                        = (known after apply)
          + volume_size                      = (known after apply)
          + volume_type                      = (known after apply)
        }

      + ephemeral_block_device {
          + device_name                      = (known after apply)
          + no_device                        = (known after apply)
          + virtual_name                     = (known after apply)
        }

      + metadata_options {
          + http_endpoint                    = (known after apply)
          + http_put_response_hop_limit      = (known after apply)
          + http_tokens                      = (known after apply)
        }

      + network_interface {
          + delete_on_termination            = (known after apply)
          + device_index                     = (known after apply)
          + network_interface_id             = (known after apply)
        }

      + root_block_device {
          + delete_on_termination            = (known after apply)
          + device_name                      = (known after apply)
          + encrypted                        = (known after apply)
          + iops                             = (known after apply)
          + kms_key_id                       = (known after apply)
          + volume_id                        = (known after apply)
          + volume_size                      = (known after apply)
          + volume_type                      = (known after apply)
        }
    }

Plan: 1 to add, 0 to change, 0 to destroy.

------------------------------------------------------------------------

Note: You didn't specify an "-out" parameter to save this plan, so Terraform
can't guarantee that exactly these actions will be performed if
"terraform apply" is subsequently run.
테라폼 적용
적용 단계에서는 구성 파일을 실행하고 AWS EC2 인스턴스를 시작합니다. "terraform apply" 명령을 실행하면 "이 작업을 수행하시겠습니까?"라는 메시지가 표시되며, 이때 "yes"를 입력하고 Enter 키를 눌러야 합니다.
[email protected]:~/terraform_demo$ terraform apply

An execution plan has been generated and is shown below.
Resource actions are indicated with the following symbols:
  + create

Terraform will perform the following actions:

  # aws_instance.terraform_demo will be created
  + resource "aws_instance" "terraform_demo" {
      + ami                                  = "ami-0a634ae95e11c6f91"
      + arn                                  = (known after apply)
      + associate_public_ip_address          = (known after apply)
      + availability_zone                    = (known after apply)
      + cpu_core_count                       = (known after apply)
      + cpu_threads_per_core                 = (known after apply)
      + get_password_data                    = false
      + host_id                              = (known after apply)
      + id                                   = (known after apply)
      + instance_state                       = (known after apply)
      + instance_type                        = "t2.micro"
      + ipv6_address_count                   = (known after apply)
      + ipv6_addresses                       = (known after apply)
      + key_name                             = (known after apply)
      + outpost_arn                          = (known after apply)
      + password_data                        = (known after apply)
      + placement_group                      = (known after apply)
      + primary_network_interface_id         = (known after apply)
      + private_dns                          = (known after apply)
      + private_ip                           = (known after apply)
      + public_dns                           = (known after apply)
      + public_ip                            = (known after apply)
      + secondary_private_ips                = (known after apply)
      + security_groups                      = (known after apply)
      + source_dest_check                    = true
      + subnet_id                            = (known after apply)
      + tenancy                              = (known after apply)
      + volume_tags                          = (known after apply)
      + vpc_security_group_ids               = (known after apply)

      + ebs_block_device {
          + delete_on_termination            = (known after apply)
          + device_name                      = (known after apply)
          + encrypted                        = (known after apply)
          + iops                             = (known after apply)
          + kms_key_id                       = (known after apply)
          + snapshot_id                      = (known after apply)
          + volume_id                        = (known after apply)
          + volume_size                      = (known after apply)
          + volume_type                      = (known after apply)
        }

      + ephemeral_block_device {
          + device_name                      = (known after apply)
          + no_device                        = (known after apply)
          + virtual_name                     = (known after apply)
        }

      + metadata_options {
          + http_endpoint                    = (known after apply)
          + http_put_response_hop_limit      = (known after apply)
          + http_tokens                      = (known after apply)
        }

      + network_interface {
          + delete_on_termination            = (known after apply)
          + device_index                     = (known after apply)
          + network_interface_id             = (known after apply)
        }

      + root_block_device {
          + delete_on_termination            = (known after apply)
          + device_name                      = (known after apply)
          + encrypted                        = (known after apply)
          + iops                             = (known after apply)
          + kms_key_id                       = (known after apply)
          + volume_id                        = (known after apply)
          + volume_size                      = (known after apply)
          + volume_type                      = (known after apply)
        }
    }

Plan: 1 to add, 0 to change, 0 to destroy.

Do you want to perform these actions?
  Terraform will perform the actions described above.
  Only 'yes' will be accepted to approve.

  Enter a value: yes

aws_instance.terraform_demo: Creating...
aws_instance.terraform_demo: Still creating... [10s elapsed]
aws_instance.terraform_demo: Still creating... [20s elapsed]
aws_instance.terraform_demo: Still creating... [30s elapsed]
aws_instance.terraform_demo: Still creating... [40s elapsed]
aws_instance.terraform_demo: Creation complete after 44s [id=i-0eec33286ea4b0740]

Apply complete! Resources: 1 added, 0 changed, 0 destroyed.
AWS EC2 대시보드로 이동하면 적용 명령이 완료될 때 언급된 인스턴스 ID로 새로운 인스턴스가 생성된 것을 확인할 수 있습니다.
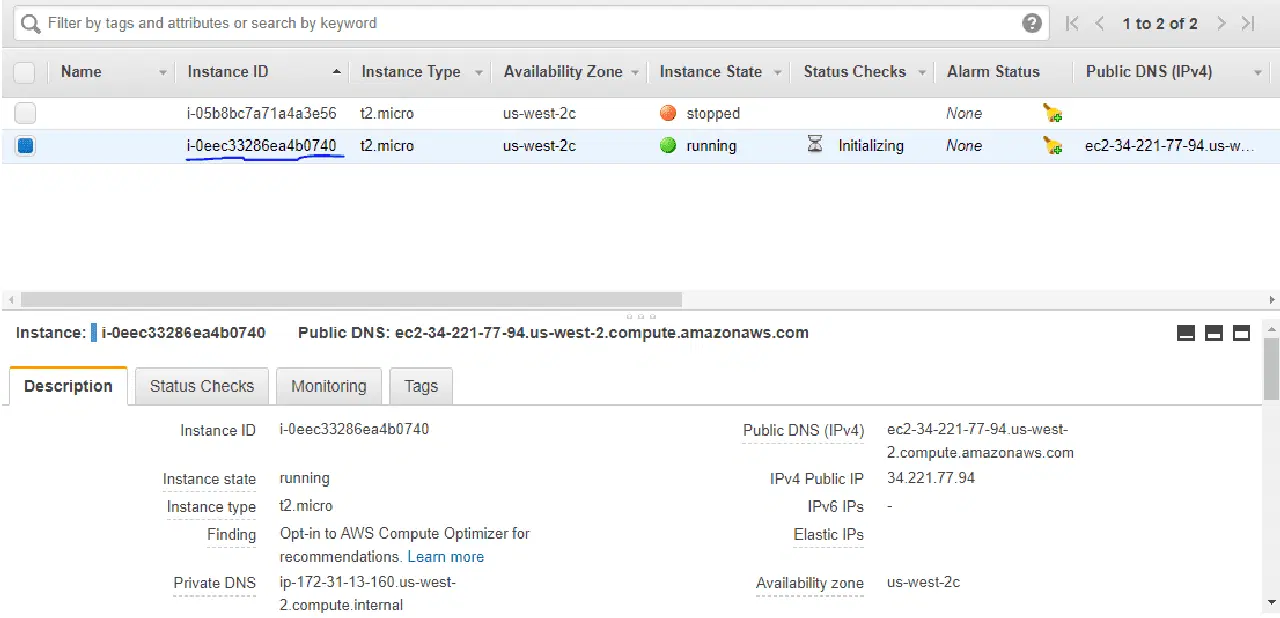
이제 테라폼을 사용하여 AWS EC2 인스턴스를 성공적으로 시작했습니다.
테라폼 파괴
마지막으로, 인프라를 삭제하려면 "destroy" 명령을 실행해야 합니다.
[email protected]:~/terraform_demo$ terraform destroy
aws_instance.terraform_demo: Refreshing state... [id=i-0eec33286ea4b0740]

An execution plan has been generated and is shown below.
Resource actions are indicated with the following symbols:
  - destroy

Terraform will perform the following actions:

  # aws_instance.terraform_demo will be destroyed
  - resource "aws_instance" "terraform_demo" {
      - ami                                  = "ami-0a634ae95e11c6f91" -> null
      - arn                                  = "arn:aws:ec2:us-west-2:259212389929:instance/i-0eec33286ea4b0740" -> null
      - associate_public_ip_address          = true -> null
      - availability_zone                    = "us-west-2c" -> null
      - cpu_core_count                       = 1 -> null
      - cpu_threads_per_core                 = 1 -> null
      - disable_api_termination              = false -> null
      - ebs_optimized                        = false -> null
      - get_password_data                    = false -> null
      - hibernation                          = false -> null
      - id                                   = "i-0eec33286ea4b0740" -> null
      - instance_state                       = "running" -> null
      - instance_type                        = "t2.micro" -> null
      - ipv6_address_count                   = 0 -> null
      - ipv6_addresses                       = [] -> null
      - monitoring                           = false -> null
      - primary_network_interface_id         = "eni-02a46f2802fd15634" -> null
      - private_dns                          = "ip-172-31-13-160.us-west-2.compute.internal" -> null
      - private_ip                           = "172.31.13.160" -> null
      - public_dns                           = "ec2-34-221-77-94.us-west-2.compute.amazonaws.com" -> null
      - public_ip                            = "34.221.77.94" -> null
      - secondary_private_ips                = [] -> null
      - security_groups                      = [
          - "default",
        ] -> null
      - source_dest_check                    = true -> null
      - subnet_id                            = "subnet-5551200c" -> null
      - tags                                 = {} -> null
      - tenancy                              = "default" -> null
      - volume_tags                          = {} -> null
      - vpc_security_group_ids               = [
          - "sg-b5b480d1",
        ] -> null

      - credit_specification {
          - cpu_credits                        = "standard" -> null
        }

      - metadata_options {
          - http_endpoint                    = "enabled" -> null
          - http_put_response_hop_limit      = 1 -> null
          - http_tokens                      = "optional" -> null
        }

      - root_block_device {
          - delete_on_termination            = true -> null
          - device_name                      = "/dev/sda1" -> null
          - encrypted                        = false -> null
          - iops                             = 100 -> null
          - volume_id                        = "vol-0be2673afff6b1a86" -> null
          - volume_size                      = 8 -> null
          - volume_type                      = "gp2" -> null
        }
    }

Plan: 0 to add, 0 to change, 1 to destroy.

Do you really want to destroy all resources?
  Terraform will destroy all your managed infrastructure, as shown above.
  There is no undo. Only 'yes' will be accepted to confirm.

  Enter a value: yes

aws_instance.terraform_demo: Destroying... [id=i-0eec33286ea4b0740]
aws_instance.terraform_demo: Still destroying... [id=i-0eec33286ea4b0740, 10s elapsed]
aws_instance.terraform_demo: Still destroying... [id=i-0eec33286ea4b0740, 20s elapsed]
aws_instance.terraform_demo: Still destroying... [id=i-0eec33286ea4b0740, 30s elapsed]
aws_instance.terraform_demo: Destruction complete after 34s

Destroy complete! Resources: 1 destroyed.
EC2 대시보드를 다시 확인하면 인스턴스가 종료된 것을 볼 수 있습니다.

결론
위 내용이 테라폼을 시작하는 데 도움이 되었기를 바랍니다. 지금 보여드린 예제를 직접 시도해 보세요.
다음과 같은 인프라 자동화 소프트웨어도 확인해 보는 것이 좋습니다.
더 자세히 배우고 싶다면, 테라폼으로 DevOps를 배우는 강좌를 참고하는 것이 좋습니다.